Raspberry Pi & Pico
Install
Official images…Raspberry Pi OS…
- https://www.raspberrypi.org/software
- https://downloads.raspberrypi.org/
- …default user
pipasswordraspberry
Write the image to an SD-card…
# or write the image to SD card
unzip -p $archive \
        | sudo dd status=progress conv=fsync bs=4M of=/dev/mmcblkX
Or use etcher to create bootable SD/USB devices.
Alternatives…
- Debian Raspberry Pi images
- https://raspi.debian.net
- https://raspi.debian.net/defaults-and-settings
- …default login
rootwith empty password - …customize in
/boot/firmware/sysconf.txt - …ethernet port runs DHCP by default
- Ubuntu Raspberry Pi Images
- Fedora Raspberry Pi 4 Image
BuildRoot
Build your own images with:
- BuildRoot Embedded Linux Build System
- Yocto Embedded Linux Distribution
- Mastering Embedded Linux, George Hilliard
Use a virtual machine as build environment:
# install depenencies
sudo apt install -y \
        bc \
        build-essential \
        cpio \
        file \
        git \
        libncurses5-dev \
        qemu-system-x86 \
        rsync \
        screen \
        unzip \
        wget \
# get the BuildRoot source code
git clone git://git.busybox.net/buildroot
# or
git clone https://github.com/buildroot/buildroot.git
# list available boards
make list-defconfigs | grep rasp
# generate the configuration for the target hardware
make raspberrypi0w_defconfig
# customization
make menuconfig # search with `/`
# build
make
# write the SD card image
sudo dd bs=1M status=progress conv=fsync \
if=output/images/sdcard.img of=/dev/mmcblkXFor debugging/testing it may be more convenient to use a:
# virtual machine configuration
make qemu_x86_64_defconfig
...
# launch the root-filesystem in a virtual machine
output/host/bin/qemu-system-x86_64 -M pc \
        -kernel output/images/bzImage \
        -drive file=output/images/rootfs.ext2,if=virtio,format=raw \
        -append "rootwait root=/dev/vda" \
        -net nic,model=virtio -net user
Directory structure:
host/           Built for the host, sysroot of the target toolchain
board/          Files and scripts to support each target board
configs/    Build configurations such as raspberrypi0w_defconfig
package/    Package definitions
output/host/    Build tools that run on the workstation
output/target/  Target output directory where target binaries are staged
output/images/  Filesystem images and the final firmware image are emitted here
USB Boot
Raspberry Pi 4 Bootloader
- …SPI-attached EEPROM (4MBits/512KB)
- …Contains code to boot up the system
- …LED warning flash codes
- …Boot Diagnostics
Check the bootloader version:
# check the version
vcgencmd bootloader_version
# update
sudo rpi-eeprom-update
# configuration
/etc/default/rpi-eeprom-update- Adjust
BOOT_ORDERconfiguration for the priority of different boot modes- Cf. Bootloader configuration
0xf14try USB followed by SD
sudo raspi-config # 6 Advanced Options -- A6 Boot Order
# view the current EEPROM configuration
sudo rpi-eeprom-config
# edit it and apply the updates to latest EEPROM release
sudo -E rpi-eeprom-config --edit
Copy the SD card to USB/SATA device
sudo dd bs=4M if=/dev/mmcblk0 of=/dev/sda
                |           |    |      |
                |           |    `------`------ USB/SATA device
                `-----------`------------------ SD device
GPIO
General purpose input-output (GPIO) connector:
- Uses Broadcom BCM2835 40-pin GPIO header
- Supports 5v, 3.3v, PWM, I2C, SPI, UART (serial)
- …
pinoutcommand show GPIO pin configuration
sudo apt install -y python3-gpiozero

# allow a user to access GPIO pins (requiers a re-login/newgrp)
sudo adduser $USER gpio
I2C/SPI
Raspberry PI SPI pinout
# install required packages
apt install -y python-smbus i2c-tools
# install kernel support
raspi-config
# select...
#       ...Interface Options, I2C or SPI Enable...
Enable a second SPI port
- …
dtoverlay=spi1-3csin/boot/config.txt - …reboot required to take effect
i2cdetect -l                 # list the <i2cbus> number
i2cdetect -y <i2cbus>        # scan the I2C bus for devices
ls -l /dev/i2c*              # check for the I2C device
ls -l /dev/spidev*           # check for the SPI device
Adafruit Blinka
Uses the Adafruit-Blinka library…
apt install -y python3 python3-pip python3-gpiozero
pip3 install adafruit-blinka
Hello world LED blinking…
- …connect the cathode (short leg, flat side) of the LED to a ground pin
- …connect the anode (longer leg) to a limiting resistor
- …connect the other side of the limiting resistor to a GPIO pin (the limiting resistor can be placed either side of the LED)
#!/usr/bin/env python3

from time import sleep
import board
import digitalio

led = digitalio.DigitalInOut(board.D25)
led.direction = digitalio.Direction.OUTPUT

while True:
    led.value = True
    sleep(1)
    led.value = False
    sleep(1)
Pico
- …built around the RP2040 microcontroller designed by Raspberry P
- …development supported with both a C/C++ SDK, and an official MicroPython port
Hardware
References…
RP2040
Dual ARM Cortex-M0+ cores…
- 133 MHz …264kB (on-chip) SRAM
- AHB/APB bus fabric
- 12 DMA channels
- PIO state machine
Chip overview…
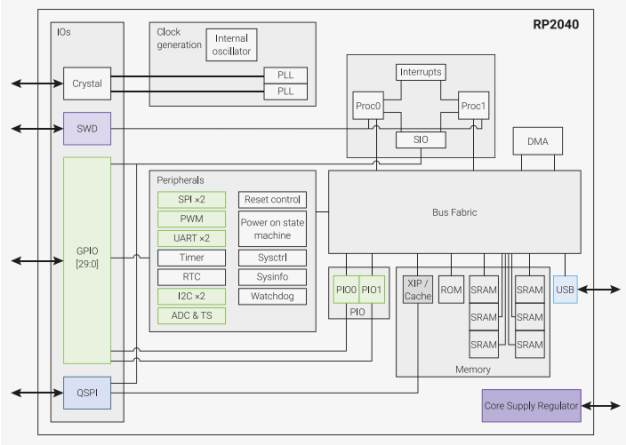
Embedded ROM and SRAM…
- …16kB read-only memory (ROM)
- …264kB of on-chip SRAM
- …access to external Flash via a QSPI interface
- …using the execute-in-place (XIP) hardware
- …software can treat flash as a large read-only memory
I/O interfaces…
- 26 multifunction GPIO
- …3 analog inputs
- 2× UART
- 2× SPI controllers
- 2× I2C controllers
- 16× PWM
- 2MB on-board QSPI flash
- USB 1.1 Host/Device controller
SIO
Single-cycle IO block (SIO)…
IOPORT …auxiliary bus port
- …dedicated bus interface per core
- …accessed with normal load and store instructions
- …one cycle read/write (32-bit)
- …SIO appears as memory-mapped hardware

Access to…
- CPUID …for software to determine on which core it is running
- FIFOs (32 bits …eight entries deep) …message passing between cores
- Hardware spinlocks …synchronisation between the cores
- Core-local arithmetic hardware …integer divider
- …access to peripherals that require low-latency
- …shared GPIO register
- …deterministic & concurrency safe access
Pinout
Mapping of pins to GPIO ports…

C/C++
- Documentation…
- Dependencies…
- CMake …tools designed to build, test and package software
- GNU Embedded Toolchain for Arm
- Tools…
- Pico Project Generator
- picotool …inspecting RP2040 binaries
Install the Raspberry Pi Pico C/C++ SDK…
# ...install dependencies on Fedora...
sudo dnf -y install \
      wget git doxygen 'arm-none-*' gcc gcc-c++ \
      automake autoconf cmake make  \
      libtool libftdi-devel libusb-compat-0.1-devel \

# clone the SDK repository ...update all sub-repositories
export PICO_SDK_PATH=~/projects/pico-sdk
git clone --branch master \
      https://github.com/raspberrypi/pico-sdk.git $PICO_SDK_PATH
(cd $PICO_SDK_PATH ; git submodule update --init)
Build a project from the Pico Examples…
# clone the source code repository from GitHub
export PICO_EXAMPLES=~/projects/pico-examples
git clone -b master https://github.com/raspberrypi/pico-examples $PICO_EXAMPLES

# ...run CMake to setup the build folder
# ...(used to consolidating all build artifacs)
mkdir $PICO_EXAMPLES/build
(cd $PICO_EXAMPLES/build ; cmake ..)

# ..build on of the projects
(cd $PICO_EXAMPLES/build/blink ; make -j $(nproc))
MicroPython
References
- Raspberry Pi Pico Python SDK Documentation
- MicroPython Documentation…
- …
rp2library for RP2040 support - …RP2 Quick Reference
- …
- Pico MicroPython Examples
Prerequisite …access to the USB devices…
sudo usermod -a -G dialout $USER
# re-login to enable this change
Install dependencies
- …Thonny Python IDE
- …
minicomto access the serial port
# on Fedora
sudo dnf install -y thonny minicom
Firmware
Install pre-build MicroPython firmware on the device…
- …BOOTSEL mode for programming firmware over the USB port
- …special mode …appears as a USB Mass Storage Device
- …hold down BOOTSEL …then connect with USB socket
- …wait for three seconds before releasing BOOTSEL
- …Pico appear as a removable drive …called RPI-RP2
- …
INFO_UF2.TXT…info about firmware, versions, etc. - …
INDEX.HTM…reference to the documentation
- …
- …download the correct MicroPython
*.uf2file…- …copy the file to the device…
- …this programs the MicroPython firmware onto the flash memory
- …take a few seconds …board will automatically reboot
- …default …MicroPython does not do anything when it first boots
REPL
Communicate with the MicroPython firmware over USB…
REPL (readevaluate-print loop)…
- …use Thonny IDE
minicom -o -D /dev/ttyACM0ctrl-d..reboot picoctrl-a + q…exit minicom
Inspect the MicroPython firmware version…
import sys
sys.implementation
References
- Raspberry Press - Books and Magazines
Hardware…
- Raspberry Pi Hardware Documentation
- Broadcom BCM2835 ARM Peripherals
- GPIOZero interface to GPIO devices with Raspberry Pi
- GPIO Pinout guide for the Raspberry Pi
- RPi GPIO Code Samples
- Wiring Pi C GPIO Interface library for the Raspberry Pi
- Adafruit-Blinka, CircuitPython APIs for CPython on Linux and MicroPython
- CircuitPython on Linux and Raspberry Pi
- pi-ap - Raspberry Pi Access Point
- Setting up a Raspberry Pi as an access point - the easy way
Raspberry Pi Pico…
- Raspberry Pi Pico Lectures…
- …ECE 4760 (Digital Systems Design Using Microcontrollers)
- https://ece4760.github.io/
- https://www.youtube.com/playlist?list=PLDqMkB5cbBA5oDg8VXM110GKc-CmvUqEZ