Hand Soldering Electronics
Why Learn Hand Soldering?
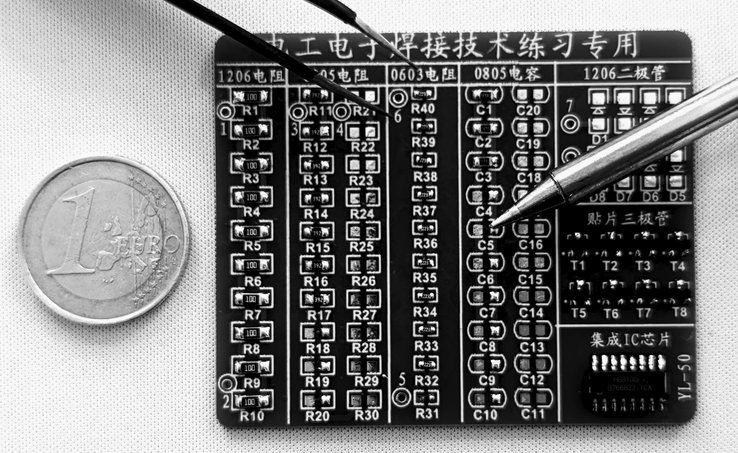
Hand soldering skills required for many DIY (do-it-yourself) projects with electronics, for example…
- …building quad copters and other RC (remote control) airplanes, cars or boats
- …home-automation and IoT (internet of things)
- …custom PC builds including peripheral devices (like keyboards)
- …assembly of home-scale maker devices (for example 3D printers)
Hand soldering uses a solder iron and solder wire to connect component leads one-by-one.
Electronics projects often involve to…
- …solder components onto a PCB (printed circuit board)
- …solder connection wires to sensors or motors
- …desolder to repair/replace components, connectors or even small microcontrollers (MCUs)
How Does it work? …solder creates a permanent bond between metal work peaces…
- …solder melted to each part of a joint (usually between a component and a PCB)
- …after cooling the joint forms an electrical connection
- …soldering creates a metallurgical bond …it chemically reacts with the metal surfaces at the joints
- …solder typical melts above 180°C, however solder irons operate above 300°C to sustains enough heat
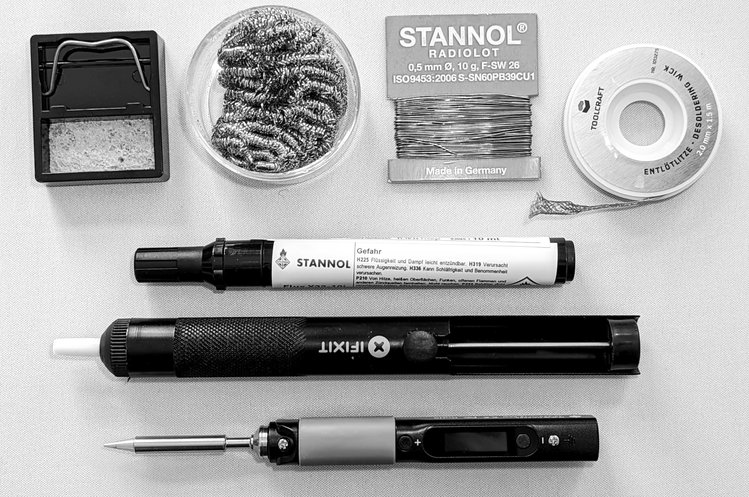
Solder Irons
For soldering electronics is is recommended to use a temperature regulated solder iron…
- …electronics control how fast it heats up …and how accurate operation temperature maintained during use
- …20 to 50 watts power rating (more is not necessarily better)
- …higher-wattage soldering irons can maintain a stable temperature longer
- …some pen style irons have a battery and/or USB-C support for portability
- …replaceable tip …different shapes (depending on the project)
- …conical tip …very fine …precision electronics soldering
- …chisel tip …soldering wires or other larger components
- …soldering iron stand (usually included with soldering stations)
- …prevents contact of the solder iron with flammable materials or accidental injury to your hand
- …brass sponge to keep the soldering iron tip clean
Some prominent options for solder irons typically recommended…
- …solder pens – Pinecil – Miniware TS
- …solder stations – Toolcraft ST-80D – Hakko FX-888D – Weller WE1010
How Do I Solder?
The process is rather simple, but requires practice…
- Turn the solder iron on (a temperature of 330℃ recommended for beginners)
- Hold the iron tip to the contact point for a few seconds
- Touch the solder wire to the contact point until it flows to the surface.
- Remove the solder iron when the contact area is completely covered
Not that applying to much heat can damage a component or a PCB surface contact plate.
Tinning The Tip
…improves the heat transfer from the solder iron to the components
Prepare your soldering iron by tinning the tip with solder:
- Clean the tip of the solder iron with the brass sponge
- Touch the solder to the tip of the iron and make sure the solder flows evenly around the tip
Desoldering
Remove components or make a correction to an electronic circuit…
Desolder a joint with solder wick (desoldering braid) [Entlötlitze]…
- Cut a small piece of braid and use a pincer to hold it (less heat-resistance)
- Place a piece of the desoldering braid on top of the joint
- Touch the tip to the top of the braid …wait until the braid absorbs the solder
Solder sucker [Entlötsaugpumpe] …handheld mechanical vacuum that sucks up hot solder with a press of a button
- Press the plunger down at the end of the solder sucker
- Heat the joint …place the tip of the solder sucker over the hot solder
- Release button to suck up the liquid solder
Solder Wire
EU regulation requires lead-free solders…
- …container mostly tin and copper (traces of other metals)
- …melting point about 30°C then normal solder …more activated (corrosive)
A 0.5mm diameter is recommend as solder wire for electronics components…
- …most suitable for electronics soldering …in particular SMD components
- …does include a very small amount of flux …recommend to use additional flux on the PCB
Recommended solder wire available in Germany… Lötzinn Felder ISO-Core “clear” 0.5mm (100g)
Why Use Flux?
Flux reduces metal oxides at the point of contact…
- …helps soldering and desoldering components…
- …improves electrical connection and mechanical strength
- …prevent toxic fumes from forming while soldering
- …chemically cleans metal surfaces
- …assist with the heat transfer …helps with flow-ability of the materials
- …protective barrier between the metal and the soldering heat
Types of flux…
- Rosin flux (r-type) used for electronics
- …can leave behind chloride ions and other corrosive residues
- …requires to remove leftovers of rosin flux agents from a PCB
- …to prevent long term corrosion related failures
- …typically done by means of 99% alcohol …or special PCB cleaner solution
- No-clean flux
- …leave less residue behind than the conventional R type flux
- …remains after soldering are non-corrosive and non-conductive
- …however residues left may be sticky and attract dust
- Water soluble flux …cleaned with deionized water and detergents
Multiple solutions to apply flux …flux found in paste form and semi-liquid gel
- …flux paste …use a paintbrush or cotton swab to apply
- …flux pen …very little excess and targeted application potential
- …flux paste with a syringe dispenser
Recommend flux pen available in Germany… Stannol Flussmittelstift FLUX X32-10i
Additional Tools
Depending on the amount of soldering work, the type of components used and the requirements on quality…
Accessible tools from the price point of view..
- Workmat usually from silicon with a heat resistance up to 500℃ …some include small compartments for components and screws
- Helping hands (or third hands) us adjustable clamps and a stable base to hold components and PCBs
- Precision Tweezers for small components (especially SMD)
Next Level
On the more expensive side …highly depending on the use-case:
- Hot Air Rework Station aka heat guns…
- …improves the capabilities to rework small SMT components on PCBs
- …this includs small packaged ICs (integrated circuits)
- Desoldering guns improve control during disassembly of components from PCBs…
- …combines a heating tip with a vacuum pump to remove solder from a joint
- …relatively expensive and usually not a useful investment for hobbyists
- Hot Plate for hot plate soldering of SMD components
- …solder paste used to place all SMD components on the PCB
- …hot plates heats the PCB from the bottom to melt the solder paste
- …this is a cheaper solution compared to a reflow oven
Small-scale Manufacturing
PCBA (printed circuit board assembly) at small to mid-scale manufacturing with PNP (pick and place) machines…
- …used to place surface-mount devices (SMDs) onto a printed circuit board (PCB)
- …remove manual labor …improve speed and placing of a broad range of electronic components
- Components…
- …components temporarily adhered to the PCB using a wet solder paste
- …solder paste dispensed on the PCB with an SMD stencils…
- …an SMD stencil is a laser cut stainless steel sheet masking the PCB only exposing parts requiring solder paste
- …vacuum-based parts picker (pneumatic suction cups)…
- …attached to a plotter-like device with a visual system for aligning…
- …to pick up and correctly place the components onto the PCB
- …component feeds aka feeders to supply components from tape reels
- …after component placement is finished the PCB is heated in a reflow oven
- …temperature follows a heating and cooling profiles according to solder material and component datasheet
- …components temporarily adhered to the PCB using a wet solder paste
Related open software and hardware – OpenPNP – Opulo (@stephen_hawes)