Piantor Raspberry Pi Pico Split-Keyboard Build
Piantor is a RP2040 (Raspberry Pi Pico) microcontroller based split keyboard…
- …the PCB design and the corresponding cases are open source under GPLv3
- …the layout is based on the Cantor Keyboard and supports 42- or 36-keys
- …the build uses a direct pin connection per switch and does not require soldering of diodes
- …therefore assembly is beginner friendly and supports both hot-swap sockets, and soldered-in switches
A Pre-soldered Piantor is available from Beekeeps (USA)
Parts
All components can be sourced from different suppliers…
- …print the PCBs using Gerber files derived from the KiCAD PCB designs
- …3D print the case bottoms and switch plates from the STL files
- …alternatively buy the Piantor Split Keyboard Kit from Keycapss (Germany)

The PCB design supports Choc V1 switches (designed by Kailh)
- …to be precise PG1350 series low-profile metal contact switches
- …note that the PCB is NOT compatible to MX-style switches
- …choc hot-swap sockets can be soldered to the PCB backside to support hot-swap of switches
- …switches need corresponding Choc keycaps
TRRS cable to connect both halves, specifically a 0.5mm TRRS cable 4-pole (..TRS not supported)
Screws (GB823 M2), 4mm (no switch plate), 6mm (with switch plate (required for for hot-swap)), 7mm (with o-rings)
Build
Quick Start Guide to Build a Piantor (Raspberry Pi Pico)…
- …flash the Vial firmware on both Raspberry Pi Pico
- …hold down BOOTSEL while reconnecting the Pico to USB
- …copying the
.uf2firmware to the USB mass storage device
Solder both Raspberry Pi Pico and the TRRS barrel jacks to the respective PCBs…
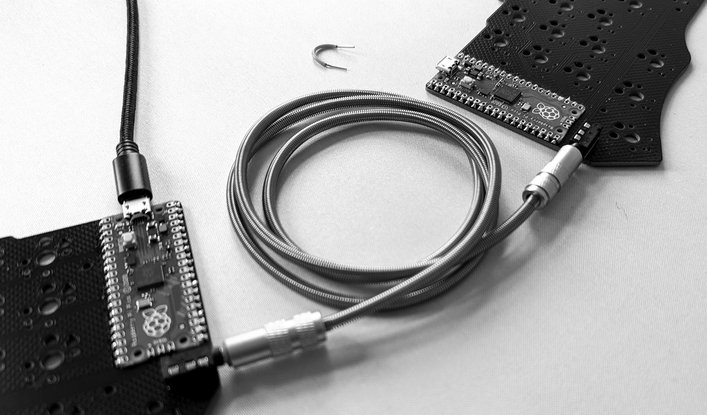
- …connect both side via the TRRS cable (before the next step!)
- …connect the left side of the split keyboard (controller) to a host using USB
- …short some of the switch contacts using a wire to test both sides
# the device be visible on the USB bus
>>> lsusb | grep bee
Bus 001 Device 017: ID beeb:0001 beekeeb piantor
Disconnect the boards…
- …use the switch plate and two switches
- …add the switches to the plate and carefully fit it to the PCB
- …make sure to not bend the switch pins
- …the switch case requires a little bit of force to fit on the PCB
- …solder all switches to the PCB, two pins per switch
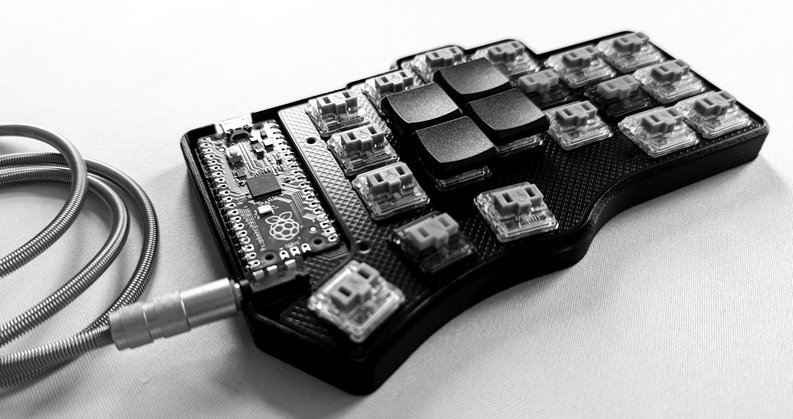
Reconnect the keyboard and test all switches for functionality.
Customization
Download Vial fro the Github release page…
wget https://github.com/vial-kb/vial-gui/releases/download/v0.6/Vial-v0.6-x86_64.AppImage

# make the AppImage executable
chmod +x Vial-v0.6-x86_64.AppImage
Configuring udev rules for VIA and Vial on Linux…
export USER_GID=`id -g`

# ...write the configuration file
sudo --preserve-env=USER_GID tee /etc/udev/rules.d/99-vial.rules <<EOF
KERNEL=="hidraw*", SUBSYSTEM=="hidraw", ATTRS{serial}=="*vial:f64c2b3c*", MODE="0660", GROUP="$USER_GID", TAG+="uaccess", TAG+="udev-acl"
EOF

# ..restart the service
sudo udevadm control --reload && sudo udevadm trigger
Start the Vial AppImage GUI application…
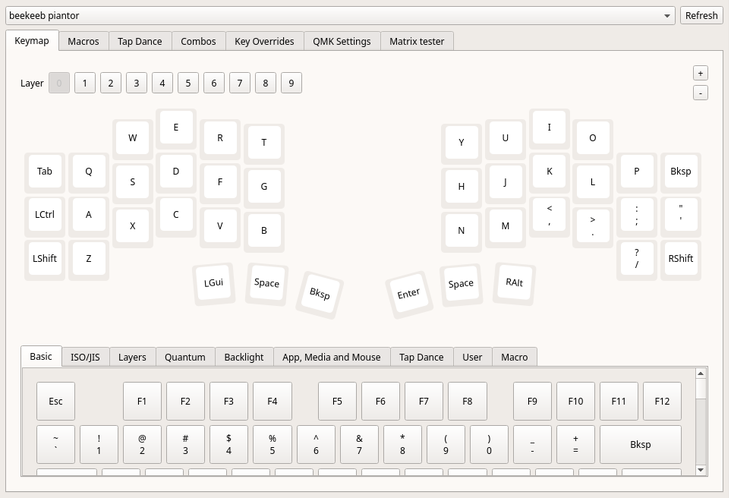
Configure a keyboard layout following instructions in the Vial User Manual.
The Vial Piantor source code is available on GitHub to rebuild the keyboard firmware.
References
Beekeep, Ergonomic Keyboards
https://beekeeb.com
Introducing the Piantor keyboard, Beekeep
https://beekeeb.com/piantor
https://showcase.beekeeb.com/piantor-keyboard
https://docs.beekeeb.com/piantor-keyboard
https://beekeeb.com/piantor