7
Tek220 and Tek340 Emulators
The Tek220 and Tek340 emulators can be opened through a Telnet, Cterm, Llogin, or Serial session. (The Tek340 emulator requires an authorization key.) The emulators are not linked directly to Telnet, Cterm, Llogin (i.e., LAT), or Tip and therefore download faster, require less memory, and can run multiple emulator sessions at once.
The Tek220 and Tek340 emulators support color text as well as foreground and background color. You can apply a color to bold, blinking, selected, and reversed text. In the Tek340 emulator, using ReGIS graphics and the supplied setup screens, you can adjust the color of graphics by changing any of the 16 color table entries. The Tek340 emulator also supports Tektronix 4010 and 4014 vector graphics.
This section presents the following information about the Tek220 and Tek340 emulators:
Note: The Tek340 emulator requires an authorization key. Refer to the Authorize command in Chapter 4, Boot Monitor. Starting a Tek220 or Tek340 Emulator
Tek220 and Tek340 sessions can be started several ways:
xpsh -display nc_address:0 tek220 -e telnet
xpsh -display nc_address:0 tek340 -e cterm
- Select a Tek220 or Tek340 session from the Client Launcher's Host Connection menu.
- Use the remote configuration file's Start or Preload commands to automatically start an emulator session when the network computer boots. Refer to Chapter 2, Remote Configuration for information about these commands.
- Use the HostMenu.
Using Emulators
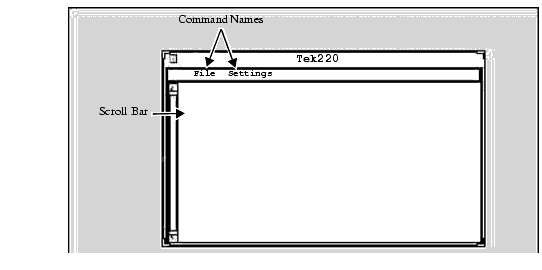
When you start an emulator, the window displays as shown in Figure 7-1.
Figure 7-1 Sample Emulator Window
These elements are part of the emulator window:
File Menu
The File menu has four commands: Reset, Start Script, Abort Script and Quit.
Reset Command
- This command resets the emulator window settings to the default settings.
Start Script Command
- This command automatically loads and runs a script created in the scripting language. For details, refer to Executing a Script.
Abort Script Command
- This command stops a script that is currently running.
Quit Command
- The Quit command closes the emulator window and exits the session.
Settings Menu
The Settings menu provides these commands:
Emulation Command
The Emulation command displays the Emulation dialog box containing the Emulation and DA Response fields.
This field provides a way to start these additional emulator sessions:
The DA Response field is used to specify the emulator's response to a device attribute request, also known as the terminal ID. This tells the host specific operating characteristics of the network computer. Specify one of these responses: VT340, VT240, VT220, VT102, VT101, or VT100. (Available options are different for the Tek220 and Tek340 emulators.)
User Features Command
The User Features command displays the User Features dialog box containing the options shown in Table 7-2.
Resize Command
The resize command allows you to select the number of rows and columns used. The default is 24 rows by 80 columns.
Color Command
The Color command (on color Tek340 terminals only) displays the Color dialog box. You can use the options in this box to adjust the 16 colors tables used in color text, and ReGIS graphics, and Sixel graphics. Tables 0 through 7 are used for color text; tables 8 through 15 are used for graphics.
To adjust a color, pick the color table, and adjust the amount of red, green, and blue that displays. Click on the slider box and move horizontally to adjust the color. You can adjust as many of the color tables that are represented in the graphic or window. Click OK when finished.
Specifying Client Resource Settings
Resource settings can be specified for Tek220 and Tek340 sessions. The resource settings can be set on the xpsh command-line, in the Client Launcher configuration file (system.launcher by default), or in one of the files listed below. The resource settings are read in the following order when started with xpsh, with the last file taking precedence over the first:
- XAPPLRESDIR/Tekterm (if the XAPPLRESDIR variable is defined)
or /tekxp/boot/<language>/app-defaults/Tekterm.- X Resource Manager String property (defined using the xrdb command) or
the $HOME/.Xdefaults file.- The file specified by the XENVIRONMENT environment variable
or $HOME/.Xdefaults-<X_terminal_name>.
- TEKTERM.DAT in XAPPLRESDIR (if XAPPLRESDIR is defined)
or DECW$SYSTEM_DEFAULTS:TEKTERM.DAT.- [<Boot Path>.APP-DEFAULTS]TEKTERM.DAT.
- TEKTERM.DAT in HOME (if HOME is defined).
- Server defaults set up with xrdb or in an .Xdefaults file or
DECW$XDEFAULTS.DAT in HOME (if HOME is defined).- XENVIRONMENT resource file (if defined) or
TEKTERM-<host>.DAT in HOME (if HOME and the hostname are found).
Note: For Windows NT, use the xpsh access method:
xpsh -access xpsh tek220 -e telnetSpecifying a Resource
A resource definition is generally composed of three parts (not all are required):
Each resource is specified on a separate line. For in-depth information about X resources, refer to the X Window System documentation.
For example, this X resource sets the default background color to light grey for all Tek220 and Tek340 windows:
This example sets the background color to blue for the Tek340 application only, overriding the previous example:
The resource attributes and command-line arguments listed in Table 7-3 can be set in one of the resource files or as part of the xpsh command-line.
- a The double-wide versions of the normal and condensed fonts must be the same height as the font, and double the width.
Examples
This example opens a Telnet window titled Sam's Window on a network computer named Sierra:
xpsh -display sierra:0 tek220 -T "Sam's Window"\ -e telnet
This example opens a Telnet window on a Tek340 terminal emulator on the network computer named Spruce with these attributes: white foreground, black background, located 30 pixels in each direction from the lower right corner, and titled Telnet:
xpsh -display spruce:0 tek340 -fg white -bg black\ -geometry -30-30 -T "Telnet" -e telnet
Keyboard Translation Settings
In addition to the resource settings, keyboard translations can be set in the .Xdefaults file to override the predefined action for a key. The keyboard translations act as macros, redefining and binding a sequence of ASCII characters or an escape sequence to a key press. The keyboard translation syntax is a subset of the X toolkit Translation Manager syntax, supporting only keypress events, designated as <Key>.
Terminal emulators have a predefined action for most keys on the keyboard (most often, an ASCII character or an ASCII escape sequence). For example, when you press the A key, an a is sent. Pressing the F6 key on a VT220 keyboard, sends Escape [ 1 7 ~. Some keys, however, may have no predefined action.
Each key press can be bound in these ways:
Specifying a String Action Example
For string actions, the ASCII character is one number in the range 0-255 decimal. Numbers can be decimal, octal, or hex. Enter printable characters (such as numbers or letters) in double quotation marks.
This example shows a translation table for a log-in keyboard macro with the Tek340 emulator:
tek340.translations: #override \
Key>F5: string("joe") string(0xa) \n\
Key>F6: string("vt220") string(0xa) \n\
Key>F7: string("DECWRITE") string(0xa)The override argument must be given at the beginning of the keyboard macro. Pressing the F5 key enters the user name joe and a line feed. Pressing the F6 key sets the terminal type as vt220 and enters a line feed. Pressing the F7 key starts the DECWrite application. Using this example, three key presses log you in and starts an application.
Securing the Keyboard Example
The secure() setting directs all keyboard actions to a specified Tek220 or Tek340 emulator window regardless of where the cursor is positioned on the display. To use the secure function, you must first define a key to invoke the secure function. In these examples, the F6 key invokes the secure function on Tek220 and Tek340 emulator windows.
tek220.translations: #override <Key>F6: secure()
tek340.translations: #override <Key>F6: secure ()Printing Example
This example sets the shifted keypad 8 key to perform a print screen showing ASCII characters only with no character attributes:
To print to a DEC printer using the shifted keypad 8 key, showing character attributes such as bold, underline, and character width and height, enter:
Specifying Keyboard Translation Modifiers
Keyboard translation modifiers precede the event specification. For example, in the following line, Ctrl is the modifier, Key is the X event, F1 is the key that is pressed, and print is the action:
- Ctrl <Key> F1: print()
This example means that pressing and holding the Control key and then pressing the F1 key causes a print action.
If a modifier is immediately preceded by a tilde character (~), it specifies that the modifier must not be pressed. A list of modifiers can also be preceded by an exclamation point (!) which specifies that pressing only the specified modifiers causes the action.
For example, to specify that the Alt key must be pressed and that the Shift key must not be pressed, the tilde is placed in front of Shift:
- Alt ~Shift <Key> F7
To specify that the Control and Alt keys must be pressed and that no other modifiers can be pressed, the exclamation point is placed at the beginning of the line:
- ! Ctrl Shift <Key> F5
Table 7-4 lists the supported keyboard translation modifiers.
The Meta, Hyper, Super, and Alt modifiers are useful only if a modifier bit 1 through 5 is bound to a key with that name. (Use xmodmap to map keys.)
For example, to find out which modifier bits are free:
- xmodmap -pm
To bind the Hyper key to the PF4 key on the VT keyboard:
- xmodmap -e "keysym KP_F4 = KP_F4 Hyper_L Hyper_R"
To bind the Hyper key to modifier bit 4 (mod4):
- xmodmap -e "add mod4 = Hyper_L"
Specifying Visual Character Attributes
To specify a character attribute, use the numbers in the table below. The Ps values are ANSI values that represent a visual attribute. You can specify multiple Ps values, and they are applied in the order given.
Character attributes are entered using this syntax:
- CSI Ps ; Ps m
where CSI is the control character (whose decimal value is 155), and Ps is the attribute number. Separate multiple attributes with a semicolon. In this example, text is displayed as bold:
- CSI 1 m
In this example, text is displayed as bold, blinking, and underlined:
- CSI 1;5;4 m
In this example, the display background is blue, and the foreground is yellow:
- CSI 44;33 m
After you enter an attribute, the emulator applies that attribute to all new characters received. Table 7-5 lists the available character attributes:
Setting ttys for Tek220 Sessions
Telnet, Cterm, and LAT sessions all use a VT220 terminal emulator. If you have applications that use DEC multinational extended character sets, you need to turn on 8-bit mode. The escape sequence commands change between 7-bit and 8-bit mode. To configure ttys for 8-bit mode:
- # stty tabs cs8 -parenb -istrip
tabs accepts tab characters without converting them to spaces
cs8 turns on 8-bit character sequences
-istrip turns off stripping off the high bit
The pass8 parameter can be substituted for cs8, -parenb, and -istrip:
- # stty tabs pass8